Managing Leave Requests
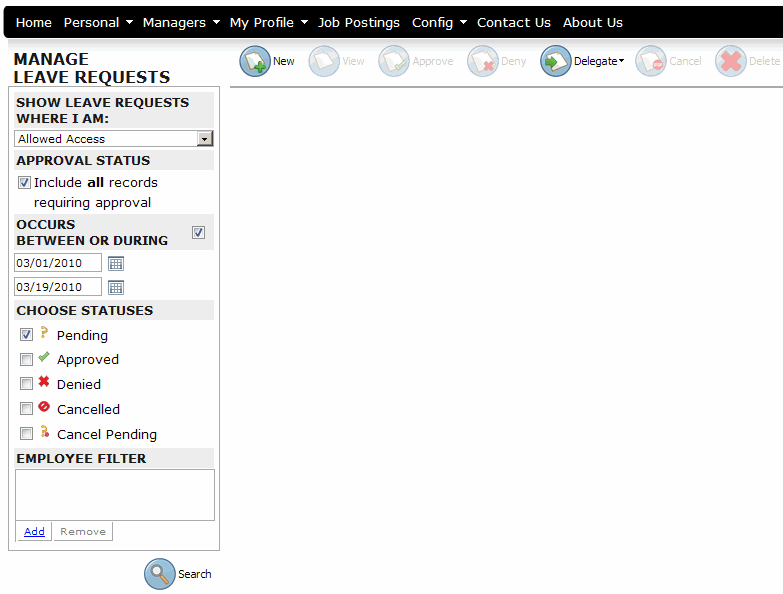
When a manager logs on to Quadrant Self Service, they can quickly view all of the pending leave requests that are waiting for their approval. These requests can be submitted by employees, or could be delegated to the manager by other managers. By default, when the Manage Leave Requests page is opened, only pending requests are visible. A manager has the option of changing settings so that they can view all requests, including those that have been approved, denied, or cancelled.
Note! When a manager reviews an employee's leave request by clicking the link on a notification, on the Leave Requests page that opens, the manager will be able to see the header and footer from the employee's Leave Requests page. When configuring Quadrant Self Service, you have the option of adding unique headers and footers, for example, instructions for submitting leave requests which only appear on employee pages. Managers will also see these headers and footers when they open an employee's leave request.
To approve a leave request
- Log on to Quadrant Self Service using your Manager user name and password.
- From the Managers menu item, select Manage Leave Requests.
The Manage Leave Requests page opens. By default, only Pending and Cancel Pending leave requests appear. A Cancel Pending leave request occurs when, for example, an employee submits a leave request and then cancels the request before it is approved. - Select a user group from the User Group list box at the upper right corner of the Manage Leave Requests page. Only employees who are members of the selected user group will appear in the list of results. If an employee doesn't appear as expected, try another user group.
- Select an option from the Show Leave Requests Where I Am: list box to refine the search to leave requests for which:
w You are allowed access
w You are a direct approver
w You are a delegate
w You are a direct approver or delegate.
- To view leave requests by date range, enter a start and end date in the Occurs Between or During boxes (optional). When a start and end date is selected, the range applies to either the start or end date of a leave. The search results include all leaves that partially or completely overlap the specified date range. The second date box defaults to clear, and the search results include all leaves after the selected the start date. To turn off the search by date range functionality, clear the check box in the heading bar.
- Select Choose Statuses check boxes to refine the search to include only leave requests of the selected status types.
- Click Search.
All of the leave requests that satisfy the selected criteria appear on the page.
- Click a leave request.
Multiple selections are allowed. - Click the Approve button.
The Approve Leave Request page opens. - If relief is not required, clear the Relief Required check box.
- Click Next.
- Enter a comment (optional), and then click Next.
- Confirm your selections, and then click Finish.
The leave request becomes approved, and disappears from the Manage Leave Requests page because the Approved check box is cleared under Statuses by default.
Note! You can select the Choose Statuses check boxes at the left side of the Manage Leave Requests page to allow other types of leave requests, for example approved or denied, to also appear on the page.
You can also use the Employee Filter to refine the list of employees.
To use the Employee Filter
- Click the Add link under the Employee Filter pane.
The Employee Search dialog opens. - Enter a full or partial employee name in the Employee Name box, and then click Search.
- Click a name in the list of results, and then click Select Employee.
The Employee Search dialog closes, and the employee appears in the Employee Filter pane. - Click Search.
- Click on an employee (or employees), and then click Approve.
To edit a leave request
- Click a leave request that you are an approver for on the Manage Leave Requests page.
- Click the Edit button.
The Edit Leave Request page opens. - Make the required changes, for example, to leave dates, start and end times, or leave type.
- Click Save.
Note! If a manager edits a leave request and then approves it without first clicking Save, the leave will be approved without the changes being made.
To deny a leave request
- Log on to Quadrant Self Service using your manager user name and password.
- From the Managers menu, select Leave Request, and then Manage Leave Requests.
The Manage Leave Requests page opens. By default, only pending leave requests appear. - Click Search.
- Click a leave request that you an approver for.
- Click Deny.
The Deny Leave Request page opens. - Type a comment (optional), and then click Next.
- Confirm your selections and then click Finish.
If the Denied check box under the Choose Statuses heading at the left side of the Manage Leave Requests page is clear, the leave request disappears from the page.
